Showing posts with label Antique It. Show all posts

My Very Own Spice Rack

Fancy that, while we were on the farm in Missouri I was gawking over grandmas spice rack... it was one that was convenient and manageable. I loved it!!! Well earlier I told you about our barn scavenging! Well while others were simply passing by this piece of gold... I snagged it!

Ok, it may be a little dusty and raggedy in this picture... BUT, i saw the potential and visioned it in my kitchen! Yee Haw!

The finished product... with the already antiqued look, all that needed to be done with it was have a little vision and wash it off!


I am still in need of a few little glass jars (that I will be purchasing at ikea)... my spices from Africa unfortunately didn't come with containers :)

And they are only $3.99 for a pack of 4! (thanks Heather Still for the eye on this).


And that's a wrap!


The "Treasures" on the Farm

Tradition: The week after Christmas there is a "Ho Down" at the Hampton farm in Missouri!
Oh... and it's crazy... crazy fun! I think the most we fit in the small farm house was 30 people at once and maybe it slept 23 the night before :). Talk about intimate... no cell service, no cable, no internet... 100% quality time with everyone for a week! Woo I think I could without talking for at least a week now!!! But, it was great! While we were at it... us-ins sister-in-laws decided not to sit around all week... so you ask what we did? Oh yes, we scavenged the old houses on PaPa's farms. They were great grandparents houses... and boy did we find some treasures!!!

So below enjoy looking through some of the good, the crazy, and the treasures that we found in Missouri!
Of course... the trip included LOTS of pictures... here is one of many!

The infamous... Hampton Farm House... yes this is where nearly 23 people SLEPT one night!
Here are the wonderful PaPa and Grandma Hampton, we love them dearly!

Did I mention, we play cards... A LOT!

While the women scavenged... the men cut down wood for the furnace!

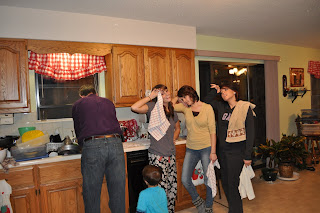
Oh and must we mention the horribly embarrassing make-up lessons that took place! Let's just say, I got lots to learn... and buy! :)

And the dishes... and the culprates! Cheryl and Grandma had a blast cooking... with EVERY utensil and pot available...

...and we had the joys of clean up! But oh was her cooking worth it!!!

The run down great grandparents houses... we tore through! Beautiful antiques!


And for the fun....

Oh and the treasures...


Papa Hampton looked at us like we were crazy for getting all this stuff... but, we told him... oh just wait til you see what we turn this into!


Geesh we got lots of stuff! Thanks to the Manuels... they brought a trailor :)


Oh I can't wait to DIY all of this goodness!!!

Did I mention we crafted A LOT while we were there too :) so fun!!! And don't you love the Crafts N Trends Bow in her hair :)

And the WHOLE crew... yea we hardly all fit on the porch :)

And then just the two of us! We LOVE the farm!


Stay tuned for the DIY's to stem from this!!!

"Where We Came From" Wall


My ongoing project in my room is finally COMPLETE! I am so thrilled to finally be able to post this! My husband is very sentimental... as I am too (he would just beg to differ). He is sentimental in the little things (all things), and I am more sentimental with few things! But, we both hold very dear to our hearts "Where we came from..." our family!

Therefore, when I had a huge open wall available in my room, I knew the project would be this: find all the pictures possible from both of families of where we came from... grandparents, great grandparents, parents, etc... anything and everything! The oldest pictures that could be found, were found.

So lets get started on how this all started and how it panned out...

First of all was the picture frame search. As many of you shoppers out there know, frames aren't cheap. My first SCORE was going to a garage sell many months ago and landing about 10 picture frames at .$10 each! So, for a $1 my project had officially started!

Then, I took a $2 can of off-white spray paint (to match our colors in our room), carefully took out all the glass pieces, and began spraying!

Ok, after that was complete they hung empty on my wall and out of the wall for a while. I knew this would be a time consuming project and wanted to make sure I had plenty of time to tackle it!

We had made a trip back in June to NC for a wedding and in the mean time was able to stop in and see Parker's family. Me and his mom (Cheryl) had a great time one evening looking through tons of pictures and scanning my favorites. That was one more step in progress (slowly coming along)...

Then for my pictures, I waited til my mom had some time to look through pictures with me and we had a great time of laughing through memories and missing loved ones as we saw them. What beautiful thing it is that we are able to have pictures to reminisce on! I love Pictures!!!

With a few steps left to do, I knew they would be the most challenging ones... so I waited til I had a long morning and sure enough... this past Saturday Parker was working, I was caught up on the house and on hair bows... so I began to tackle the next steps! After going through pictures I quickly realized that 10 frames was not enough.. so I had to get more so I first went to Goodwill (first Saturday of the month the whole store is 50% off) and I was able to get about 11 more picture frames!

Well, I then came home, measured each frame and carefully marked how many pictures of each size I would need (TIME CONSUMING!). After that was complete I printed pictures off.... and I was soooo close to being done!

I contemplated spray painting all the frames off white, and then I thought it may give an eclectic look if I don't spray the new frames, so I didn't... I collaged the pictures on the floor like I wanted and carefully hung them each on the wall! And almost with tears in my eyes, the project was finished... I can't go in my room without loving on that wall! It is more than just a wall... It is Where We Came From!

(Oh and do you like my chandelier? Craigslist find for $15!!!)

Thanks for hanging with me on this post... I know it was long, but I had to share the details since I have been waiting SO long to finish this and share!

{How To Antique A Dresser}

I told you to stay tune for the white antique dresser that was quite the yard sale find. I purchased this dresser for $10 and made it to look worth a lot more than this!


Here is the before picture (well after I had started sanding it):


*First step was to sand it down completely ( I used a electric sander which made life a lot easier).


* Secondly, Prime the dresser.


* Thirdly, paint the dresser the color of your choice (my choice was white).

* Fourthly, decide if you want to purchase new hardware for the drawer knobs (which is the more expensive route) or if you want to spray paint the old knobs (what I did).


I found a brassy metallic spray paint at Lowes that I have begun spray painting everything with! I love it!

* Fifthly, let everything dry and put your dresser back together... knobs on drawers and drawers in dresser.

Lastly, Sand down the edges and lightly over the entire dresser to make the dresser appear antique...

Voila...


If you are interested in learning how to build something like this... check out Ana-White's Blog.